


Non-fungible tokens (NFTs) have become a trend in recent years, with several NFT artists earning millions from their art. Play-to-earn games in which you trade with NFTs have also contributed…

Non-fungible tokens (NFTs) have become a trend in recent years, with several NFT artists earning millions from their art. Play-to-earn games in which you trade with NFTs have also contributed to the hype around non-fungible tokens. So it’s understandable that many people would like to learn how to mint an NFT. If you’re one of them, we’re breaking it down for you below.
Why would you mint an NFT?
An NFT is a digital certificate. Commonly, it serves as proof of ownership and authenticity of a digital asset like artwork (graphic, audio, or video), or in-game assets for some digital worlds. It is built on the blockchain, most typically Ethereum.
NFTs have become a popular way for artists and gamers to monetize their work. Selling digital files is nothing new. Still, the NFT technology can also guarantee that creators receive credit and royalties on the first sale and any future sales. Plus, the buyer or collector can rest assured that they buy an authentic piece.
NFTs can represent real-world assets too like works of art, collectibles, tickets, real estate, etc. In fact, NFTs can be an unhackable verification method for numerous purposes. This is why they have the potential to revolutionize a variety of industries and become an essential part of our everyday lives. This is another good reason to get familiar with the process of minting NFTs.
What does it mean to mint an NFT?
“Minting” is the process of creating an NFT. During this process, you create an immutable record of authenticity and ownership on the blockchain. This record is public and easy to verify. This means that when you mint an NFT, you’re publishing this record on the blockchain and thereby making it purchasable.
When minting an NFT, the creator is recorded as the owner on the blockchain. When your NFT is sold, the buyer is recorded as the new owner of the asset. The process of buying and selling, that is transferring the NFT from seller to buyer, is simple and automatic thanks to Smart Contracts.
What is a Smart Contract and how does it work?
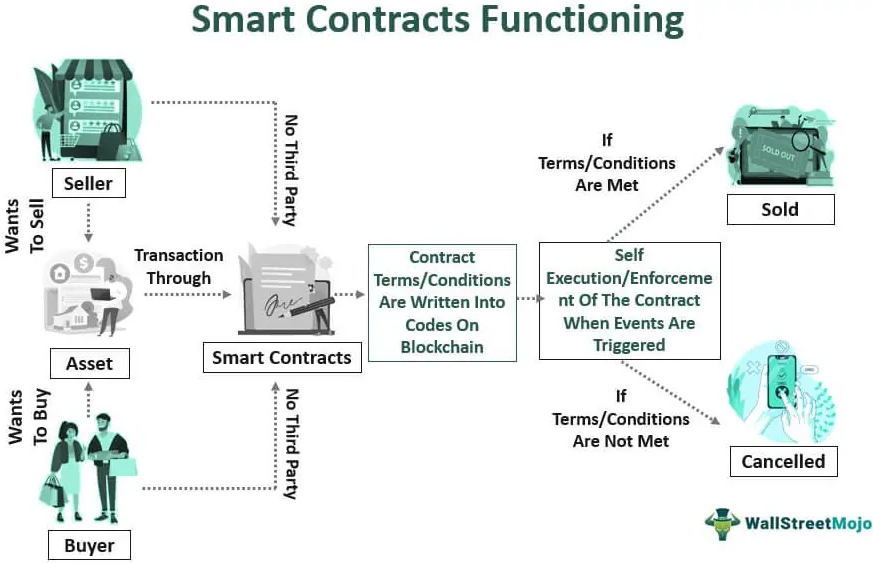
You can mint (create) and trade NFTs with the help of smart contracts. A smart contract assigns ownership, controls access and manages the transferability of the NFTs. It’s basically a self-executing contract on the blockchain. It’s governed by a programming logic such as if step ‘a’ happens, then perform step ‘b’.
When these specified conditions are met, the transaction occurs automatically and is recorded on the blockchain. The transaction is immutable (cannot be changed or disputed) and there are no third parties involved, which enhances trust and transparency. This also means reduced costs as there are no intermediaries.
Where are NFTs stored?
It’s crucial to understand what is stored where when you mint non-fungible tokens. Both the asset (most of the time an image) and its metadata are stored on servers and not on the blockchain.
An NFT image is not stored directly on the blockchain, but rather on a separate server known as an IPFS (InterPlanetary File System) server.
The blockchain only stores a reference to the IPFS address where the actual image file is hosted. This allows for efficient storage and management of NFTs on the blockchain without needing to store a large amount of data that the images would take up on the blockchain itself.
The rationale behind this is that an NFT is a digital representation of an asset. It states that the work of art or other item exists. The blockchain records its existence and all transactions that occur after the creation of the asset.
The work of art itself is usually stored on an IPFS server, but we’ll come back to that later!
How to mint an NFT?
We’ll now take a more detailed look at the third step, minting NFTs. There are 2 options you can choose from: minting directly on a platform like OpenSea or Rarible or minting with your own smart contract.
Mint directly on a platform like OpenSea or Rarible
NFT marketplaces are an easy and straightforward way to create, buy and sell NFTs.
On OpenSea, you will need to create a crypto wallet like MetaMask and connect it to the platform. This wallet holds your NFTs and your crypto. After you create a collection, you’re ready to start minting.
On Rarible, you also need to connect your wallet but you can choose which blockchain you want to mint your NFT on. Once you upload your file and provide the information about your asset, your NFT will be ready in a few minutes.
Mint with your own smart contract
Minting an NFT involves obtaining the necessary code, installing it along with any dependencies, creating and deploying a smart contract on a blockchain network, and finally minting the NFTs using the deployed smart contract.
Code repository
First thing first, you’ll need a code repository that contains the piece of code that allows you to create and deploy a smart contract on the blockchain you want to use to mint your NFTs.
You can find a lot of smart contract repositories online. You should be careful though if you use one you didn’t build or one from an unknown source as it can pose security risks. Some chains offer free smart contract kits, like Chainlink.
Install (clone repository)
When you have your repository, you can launch the command prompt by typing “CMD” in your window search bar. Then you need to pick the location where you want to clone the repository. To do this, type “cd” in the command prompt followed by the path to the desired folder.
Here we want to clone the repository in the “Documents” folder so we use the command:
C:\Users\Thomas>cd C:\Users\Thomas\DocumentsThen we enter “git clone” followed by the URL of the repository.
C:\Users\Thomas\Documents>git clone https://git.mintingnft.com/exap/how-to-mint-nftsInstall dependencies and scripts
Depending on the repository you’re using, you might need to install the node.js dependencies and hardhat dependencies using the command prompt. This process is well documented on the web, so we’ll skip that part.
Once we install the repository and the dependencies, we can go ahead with creating and deploying the smart contract. Here the first step is to set up our environment, for this, you’ll need:
- Your private Key
- An API key for the block explorer of the blockchain you want to use (Etherscan, Polygon Scan, BSCScan, etc.)
- The RPC link of the network you want to use (here, we’ll use Rinkeby testnet)
The private key and the API key we’ll go in a .env file that you’ll create from your favorite text editor and save as a file named “.env”, which should look like this:
#Your private key
PRIVATE_KEY= PRIVATE KEY
# Apikeys for block explorers
# Used for Smart Contract validation
ETHERSCAN_APIKEY= API KEY
BSCSCAN_APIKEY= API KEY
POLYGONSCAN_APIKEY= API KEY
Note that the format can vary depending on the repository you’re using.
Pinata account
Now you need to host the NFT asset, most of the time an image, on the IPFS system. You have several ways to achieve this but the easiest one is to use Pinata.
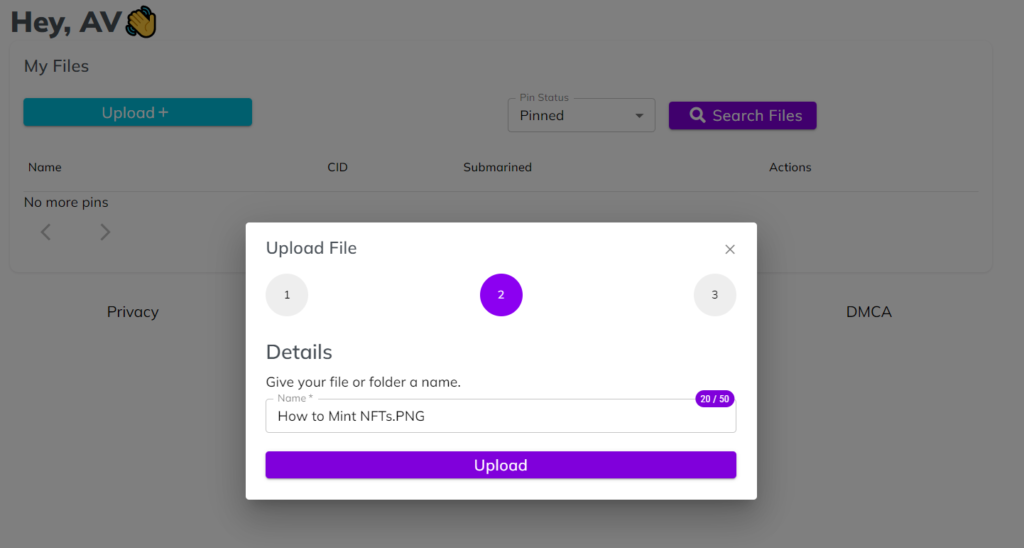
Create and upload the image
After creating your pinata account, you can upload your image and obtain its IPFS link, the link should look like this:
https://alphaverse.mypinata.cloud/ipfs/QmTSb5zdpdwUYsJeCgEMSKuTkZhe1s1sDJmwG5yRwqvP7UCreate and upload metadata
Now, we have to create and upload our .json files that contain our NFT metadata. If you want to mint a full NFT collection at once, you’ll need to upload several images, store the links somewhere and create one .json file per NFT in the collection. For 100 NFTs you’ll need 100 images and 100 .json files.
A classic OpenSea NFT metadata goes like this:
 "name": "How to mint NFTs",
     "image":"https://alphaverse.mypinata.cloud/ipfs/QmTSb5zdpdwUYsJeCgEMSKuTkZhe1s1sDJmwG5yRwqvP7U",

   "description": "This is how you mint an NFT with a smart contract",

   "attributes": [

{
"trait_type": "ATTRIBUTE 1 NAME",
"value": "ATTRIBUTE VALUE"
},

{
"trait_type": "ATTRIBUTE 2 NAME",
"value": "ATTRIBUTE VALUE"
}- “name” is the name of this NFT
- “image” is the link to your file hosted on IPFS through Pinata
- “description” is the text showing up to describe the NFT
- “attributes” are special traits given to NFT (optional)
Each metadata file name should be a number, and that number will be the token ID we will use for minting later on.
Once the metadata are saved in the .json files, you can upload the folder containing them on Pinata, and store the IPFS link of the metadata folder. The IPFS folder with the metadata should look like this if you uploaded several .json files.

Create and deploy a smart contract to mint your NFTs
Now, we can go back to the command prompt and create the smart contract for our collection. This means running the npm run operate command in the prompt, but that might differ depending on the source code you’re using.
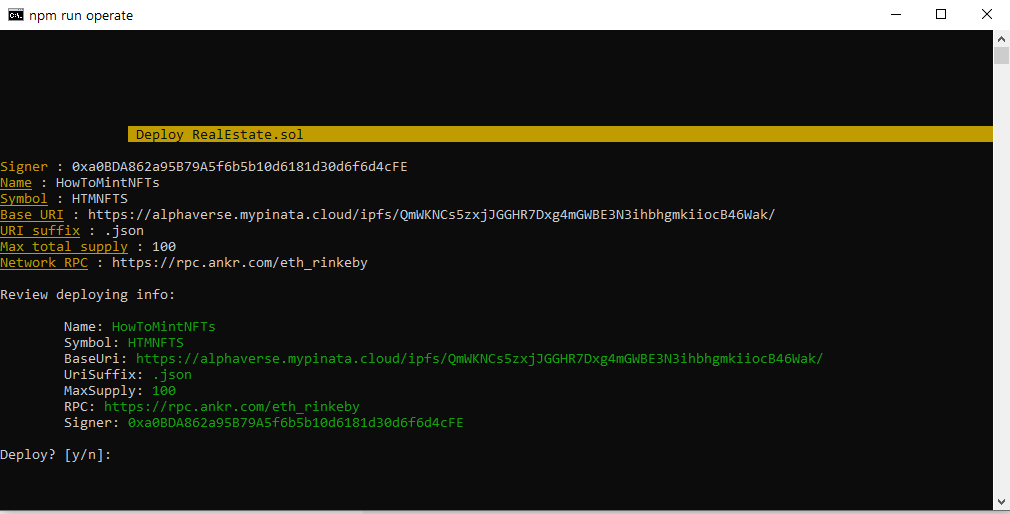
Here we have to enter the properties of our smart contract.
- Signer: the public key of the mining wallet
- Name: name of the smart contract
- Symbol: ticker of the smart contract and its NFTs
- Base URI: put the link to the Pinata folder with the metadata
- URI Suffix: put
.jsonas our metadatas are in.jsonformat - Max Supply: self-explanatory
- Network RPC: the link to the network endpoint you want to mint on. Here we are on one of Ethereum’s test networks: Rinkeby
Verify smart contract
Once you deploy the smart contract, we recommend manually verifying it on a block explorer. This is advisable because few scripts do this automatically and verifying the contract is a plus on the tech side but also as a matter of credibility in front of the users. This process is also very well-documented on the web. Each block explorer has specific documentation on how to do this step.
Mint NFTs
Now that we have, an image hosted on IPFS, metadata hosted on IPFS, and a deployed smart contract, we only need to mint our NFTs!
The last step here is to create a spreadsheet with 2 columns:
- One for the token IDs of the NFT you want to mint (according to the labels you used in the folder you uploaded on Pinata)
- One with the destination wallet for each NFT. The easiest way to proceed here is to mint all NFTs in your wallet, then send them elsewhere if need be.
| Token ID | Wallet Address |
| 1 | 0xabcde123456789 |
| 2 | 0xabcde123456789 |
| 3 | 0xabcde123456789 |
The .csv file should look like this. Once we save it, we can use it to tell our smart contract which NFTs to mint. In the example above, the smart contract will mint the NFTs with the token IDs 1, 2 and 3.
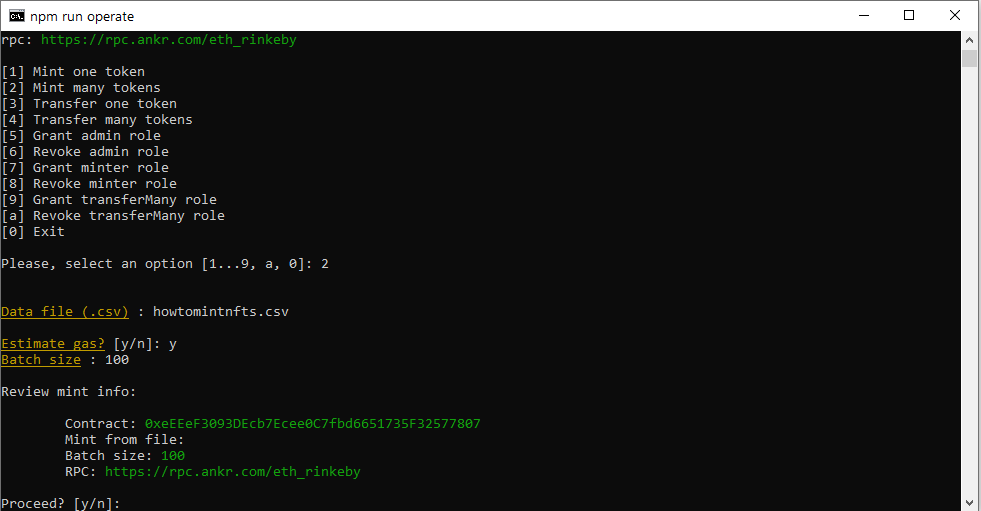
On our script we have several minting options, here we’ll mint several NFTs at once, 100 NFTs to be precise.
Conclusion
Depending on the method or platform you choose, the process of minting NFTs may be slightly different. Still, the basic requirements are the same: you need a unique digital asset and some crypto to pay the minting fees.
If you want to sell your NFT, you will also need a non-custodial wallet and an NFT marketplace. Whether you’re a creator, a gamer or a crypto enthusiast, knowing how to mint NFTs is always useful. NFTs are here to stay and we hope to see even more diverse applications and use cases in the future.